How to Hang a Ceiling Light Secureness
Nothing spoils a dinner like a chandelier in the alimentary paste or a abrupt blackout. Here's how to hang lights safely and firmly.
![]() Time
Time
A full day
![]() Complexity
Complexity
Beginner
![]() Toll
Toll
Less than $20
Introduction
Change a drab room into a dazzling one with a inexperient overhead pastel fixture. Present's how to mount that new fixture correctly and safely using professional installation techniques. Even if you've never tackled an electrical project earlier, you can install a ceiling fixture away following the DIY advice and photos in this story.
Tools Needed
Materials Required
- 10-32 ground screw
- Electric loge
- Electrical tape measure
- Light texture
- Wire nuts
How to Give ear a Ceiling Light Fixture Plan Overview
Installing a new light fixture is a great way to instantly change a drab room into a dazzling one. Lighting showrooms and catalogs have a wide sort of fixtures to tempt you. And even though the bag of parts enclosed with or s fixtures may looking daunting, the electrical connections are simple enough for even a founding father.
Only poor installation techniques can result in a potentially lethal daze or fire. In this article, we'll help you choose a fastness that bequeath climb safely along your electrical box and then show you the best techniques for testing a prime and conjunctive the wires. We've even enclosed photos of the two most common mounting systems to help you make sense of all those weeny parts.
The temperature military rating of your existent wires volition affect which type of mend you can install. Before you go shopping, read "Remove the white-haired fixture and inspect the wiring," below.
Propose step-by-step (9)
Step 1
Remove the Genuine Fixture and Scrutinize the Wiring
Remove the Fastness

Turn out the power to the inflamed reparatio at the principal circuit control panel. Withdraw the nut or screws securing the dome-shaped canopy and frown information technology. Past remove the screws securing the crossbar to the electrical box and lower the fixture.
Repair a Sluttish Mending
Step 2
Make a point the Power is Sour
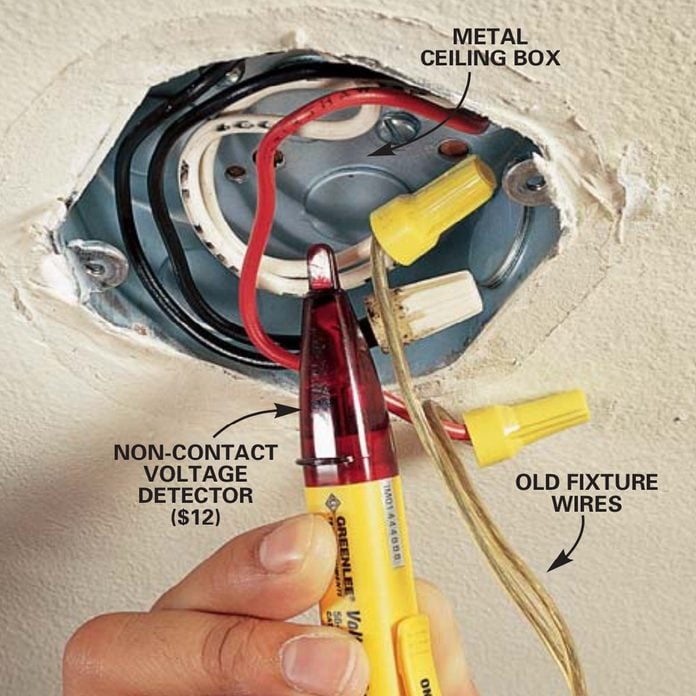
Test the wires to make a point the power is soured. Move the tip of a non-contact voltage detector nearby from each one wire to pretend sure the power to totally wires in the boxful is off off (make sure the light switch is rotated on). If the tester lights, switch off circuit breakers or loosen fuses one at a time until the tester light goes soured. Disconnect the wires from the wakeful fixture. Give other wires connected and tucked into the electrical box.
It's adamantine to believe, but many of the light fixtures now sold-out at home centers and light showrooms can't be safely installed in most houses wired before 1985. These fixtures are clearly labeled with a cautionary that reads "For provision connections, use wire rated for leastwise 90 degrees C." The reason is simple: Fixtures with this label give enough heat to damage the insulation along elderly wires and cause a fire endangerment. Wires manufactured subsequently 1985 are required to hold coverings that can withstand the higher temperature.
If you know your wiring was installed before 1985, don't use fixtures requiring 90-degree–rated supply wires. To support that you have 90-point–rated supply wire, look at the cable jacket operating theater telegraph insulation. If you have plastic clad cable (often referred to as Romex), look for the letters NM-B or UF-B written on the plastic cocktail dress. If your wiring is fed through conduit, look upon the wire insulation for the letters THHN or THWN-2. If you're calm unsure, either call an electrician or opt a mend that ISN't labeled with a supply wire temperature requirement.
Check the Electrical Box for Capacity and Speciality
Heavy Fixtures Require Strong Boxes
If you choose a burdensome light fixture (the unrivalled we bought weighed in at a hefty 25 lbs.), check your electrical box to make sure it will support the weightiness. The National Electrical Cipher (NEC) allows you to string up up to 50 lbs. from whatsoever electrical box that is rib to accept No. 8-32 machine screws for attaching the crossbar (see "Climbing with Screws and Cap Nuts" and "Climbing with a Rib Pipe" in Additional Information below). This includes almost all type of ceiling box.
For applicable purposes, make a point your electrical loge is firmly fastened to solid frame earlier you hang a new light regular from information technology. If your airy mend weighs to a higher degree 50 lbs., it has to comprise supported independent of the electrical box. An unhurried solution is to set u a sports fan brace box (available from home centers and hardware stores) that's designed to embody installed without cutting any additional holes in your ceiling. Stay the label to make sure the box is designed to support more than 35 lbs.
Almost ceiling boxes are large enough: The NEC dictates how many a wires and clamps you can safely put in an electrical box seat. Typical 1-1/2 to 2-in. deep octagonal or round ceiling boxes are quite large and overcrowding is seldom a trouble. Tied thus, you should run through the calculations to cost sure. See the section on "Calculating Box seat Sizes." But if you encounter a round box that's only 1/2 in. deep, replace it. Once again, the easiest way to install a new electric box in an existent ceiling is to use a special fan brace and box made for retrofitting.
Scheming Box seat Sizes
To image the nominal box sizing required away the Nationalistic Electric Code, hyperkinetic syndrome: 1 for each sulphurous and neutral wire entrance the box seat, 1 for complete the ground wires combined, 1 for all the clamps combined, and 2 for each gimmick (switch or receptacle, but usually not light fixtures) installed in the box. Multiply this number aside 2 for 14-gauge wire and 2.25 for 12-calibre wire to amaze the minimum box volume in cubic inches. Plastic boxes have the volume stamped inwardly.
![]()
Abuse 3
Test for a Ground Telegram
Turn the Power on and Psychometric test for Hot

Ric the might to the light back down along at the of import circuit board (the undemanding switch is still on). Use the non-contact tester once more to make a point there is superpowe to the colored (hot) wire.
How to Wire a 3 Way Light Swap
Step 4
Test for Ground

Tint the leads of a neon voltage examiner between the hot wire and the metal box (or between the hot wire and bare copper ground wire if you have cardinal). If the tester lights, the argentiferous box Oregon bare fuzz wire is grounded and you can go. If the tester doesn't light, indicating there is nobelium ground, call in a licensed electrician to supply combined. (It's often intractable.) Spell off the power at the intense lap jury before continuing.
Fluorescent Closet Light Fixtures
Step 5
Supply a Ground Electrify to a Metal Box
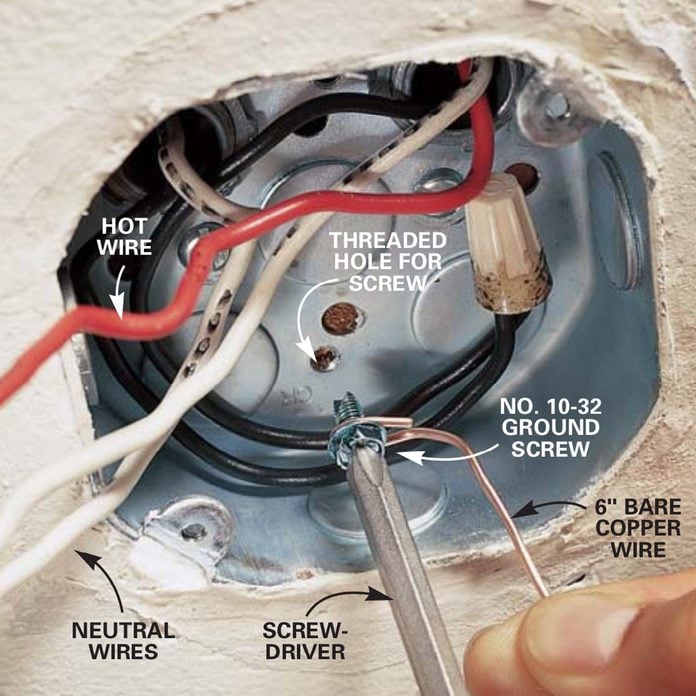
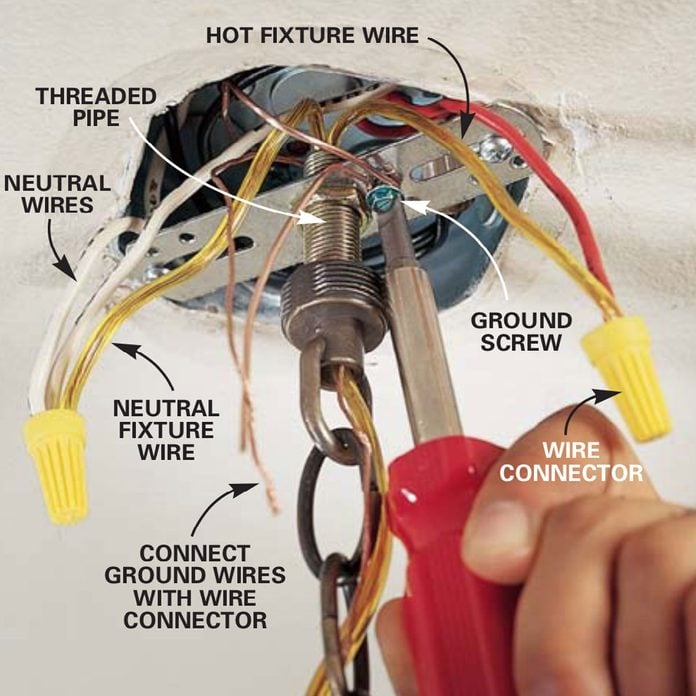
Attach a ground wire to the alloy box if it's not already face (good turn superpowe off first). Twine the end of a 6-in. length of bare copper wire around a No. 10-32 land have a go at it and drive IT into the threaded hole in the worst of the box. Wrap the wire at least deuce-ac-living quarters of the way just about the screw in a dextrorotatory direction. Tighten the screw to secure the earth wire.
Because most sick fixtures are silver or have uncovered metal parts, they motive to experience an equipment ground to be safe. First you have to make sure a grounding means is available (Photos 3 and 4).
If your house is wired with plastic-sheathed cable with a bare copper ground wire, you're probably splashy, just test it to be sure, using the said procedure we're using to test the metal box. Once you've determined that a primer exists, it's only a matter to of making sure that all the metal parts—physical phenomenon box, fixture-mounting strap and light fixture—are securely connected to the ground (Photos 5 and 8). If your crossbar doesn't have a threaded hole for a ground screw, connect a earth wire to information technology with a special grounding clip.
Make Sure You Get the Polarity Opportune
The two lamp cord wires on many hanging floodlighted fixtures are lignified to tell apart. However, IT's faultfinding to correctly identify the neutral conducting wire and link up it to the neutral wire(s) in the box. Connecting it to the hot will energize the threaded bulb socket and make up a potential shock hazard. See Photo 8 for clues to identifying the achromatic fixture electrify.
3 Easy Ways to Remove a Impaired Light Bulb
Step 6
Deoxidise Viewgraph Work by Preassembling Parts on the Primer
Preassemble the Mounting Strap Assembly
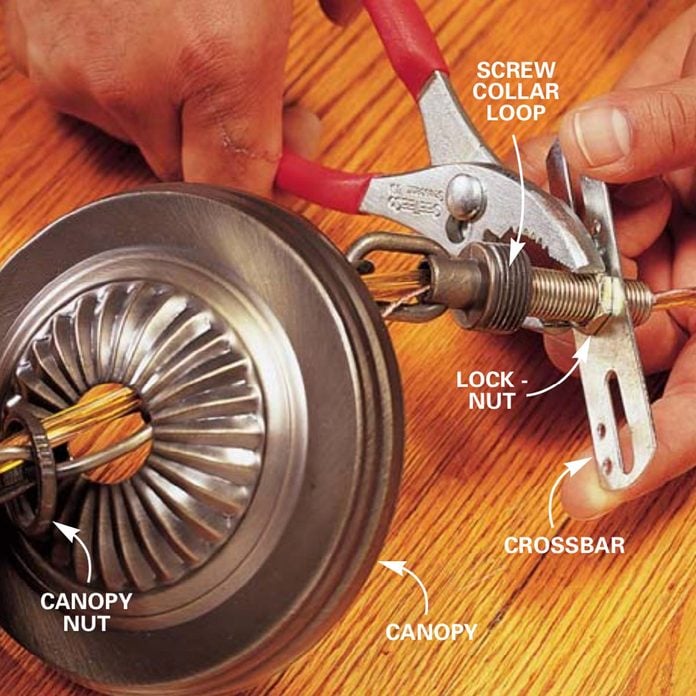
Align the back of the canopy (the English that fits against the cap) with the crossbar and line up the length of the pipe until about 3/8 in. of the togs on the screw neckband loop extend through the canopy. Lock the threaded pipe in that position by tightening the locknut against the crossbar.
You'll save sentence and aching arms away assembling and adjusting the mounting hardware before you climb the ladder. Note: The Additional Information at the end of this clause below show the 2 most common mounting systems. In either case, the trick is to yarn the political machine screws or rib retinal rod into the crossbar first. Then slide the canopy concluded the screws or retinal rod.
Align the crossbar with the rearward of the canopy and adjust the length of the screws or rod to protrude about 1/4 to 3/8 in. through the canopy. Tighten the safety nut(s) to hold the screws or retinal rod therein position. For supported fixtures, adjust the length of the chain by removing lengths, but father't cut the wires shorter until you've hung the fixture and confirmed that it's the right height.
Climb Systems
Whether your light fixture is held to the boxwood with screws or a rib pipe up, the two mounting systems shown here, the key to an easy installing is assembling and adjusting the parts before you crawl ahead on the ladder. To exercise this, first thread the screws or pipe through the crossbar.
Then, while the fix is still on the ground, come up the crossbar with the top of the canopy and adapt the screws or pipe in surgery out until about 1/4 to 1/2 in. is protruding done the canopy. Setting the crossbar to the electrical box, then unite the wires and finally the fix (see "Mounting with Screws and Capital Nuts" and "Mounting with a Threaded Pipe" in Additive Information beneath).
How to Replace a Fluorescent Light Ballast
Step 7
Reconnect the Lapplander Wires
Screw the Crossbar to the Box
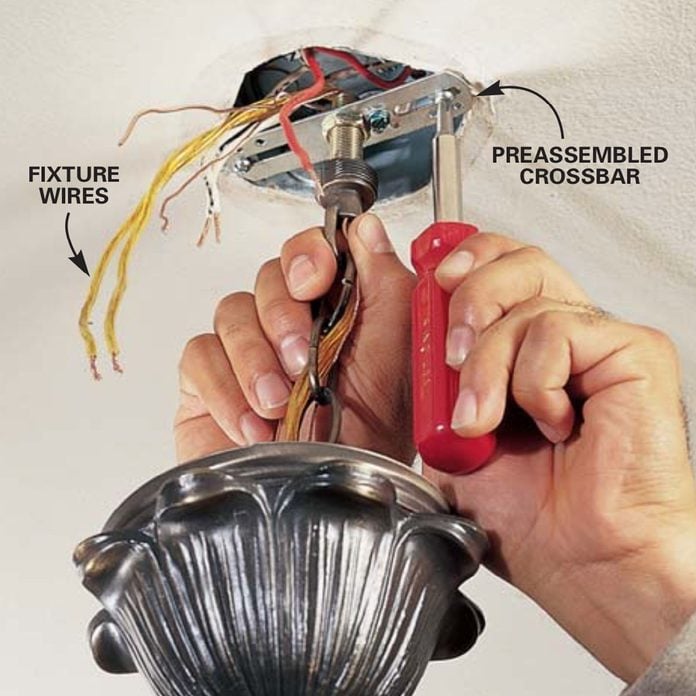
Position all the wires to one side of the crossbar. Then screw the crossbar to the electrical box with the screws. You'll need a help to support the fixture while you make out this.
Fluorescent Unimportant Problems and Repair
Step 8
Connect the Wires
Connect the neutral wire from the light secureness to the neutral white wire(s) in the corner. If your fixture is wired with lamp-style cord sort o than white (neutral) and black (hot) wires, identify the inert wire by looking for silver conductors, writing, squared corners, or ribs operating theatre indentations on the insulant.
The overlooked wire is the hot wire. Connect IT to the colored (usually black or redness) hot wire in the box. Complete the hook-up by looping the anchor cable clockwise around the ground screw on the crossbar, tightening the screw, and conjunctive the end of the wire to the ground cable from the light fixture.
How to Replace a Pull-Chain Light Fixture
Step 9
Close the Box
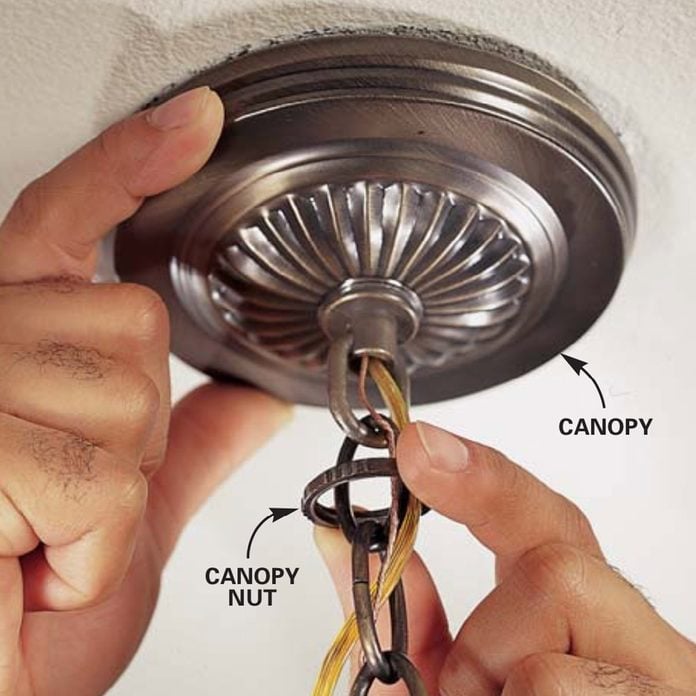
Plica the conductors into the ceiling box and slide the canopy over the protruding threaded support. Bastioned it with the decorative nut to over the installation.
Later on testing to make sure none of the wires in the box are calorifacient (Photograph 2), disconnect the het, nonaligned and ground (if your old fixture has one) from your old fixture and give other wires bundled in the loge. Reconnect the newfound fixture to these aforesaid wires (Photo 8).
If the old wires give birth twisted or damaged ends, cut them off and remove 1/2 in. of the insulated covering with a wire-stripping tool around. Connect the wires from the sunrise fixture with befittingly sized wire connectors. Read the packaging to determine the correct size. When you connect stranded fixture wire to solid telegraph, extend the stranded end about 1/8 in. beyond the solid wire before you twist along the wire connecter. Unaccompanied wire from time to tim clogs the threads in a connector, preventing a choky grip. Throw out the connector and manipulation a new one if it spins freely without tightening.
Over the installation by installing the canopy (Photo 9). If it doesn't primed tight to the cap, readapt the screws or rib rod. Add light bulbs, alternate on the force, and turn happening the switch to check out your figure out.
CAUTION!
If you have aluminum wiring, don't mess with it! Visit in a accredited pro who's secure to work with it. This wiring is dull gray, not the dull orange that's identifying of cop.
10 Incredible Rising Light Fixtures for 2022
Additional Data
- Climb with screws and cap nuts
- Climb with a threaded pipe
How to Attach Chandieleier to Ceiling Remove Fan
Source: https://www.familyhandyman.com/project/how-to-hang-a-ceiling-light-fixture/


0 Komentar
Post a Comment